The target audience: engineers
| Оглавление |
|---|
| Информация | ||||
|---|---|---|---|---|
| ||||
|
| Информация | ||
|---|---|---|
| ||
VMware's Product documentation and Technical Articles were used. |
| Примечание |
|---|
VMware vSphere hypervisor is needed to create a virtual machine. A hypervisor, also known as a virtual machine monitor or VMM, is software that creates and runs virtual machines (VMs). A hypervisor allows one host computer to support multiple guest VMs by virtually sharing its resources, such as memory and processing. |
Creating a Virtual Machine with the New Virtual Machine Wizard.
To create a new Virtual Machine ( VM ) launch vSphere Client, select Inventory in the Main Menu.

Right-click any inventory object that is a parent object of a VM, (such as a data center, folder, cluster, resource pool, or host) to assign it a parent object for VM, and then select New Virtual Machine.

In a New Virtual Machine window on the 1 Select a creation type page, select Create a new virtual machine and click Next.


On the 2 Select 4 Select storage page page, choose next:
a datastore or datastore cluster where VM's files should be stored inVM storage type, by default – Standard
VM Storage Policy, by default – Datastore Default.
a datastore or datastore cluster where VM's files should be stored in
Click Next.

On the 5 Select compatibility page, select the VM compatibility with ESXi host with ESXi host versions and click click Next. To have an access to the actual hardware latest hardware features, select the latest ESXi host latest ESXi host version.

On the 6 Select a guest OS page select nextspecify:
Guest OS Family – Linux
Guest OS Version – Other 4.x or later Linux (
хх64-bit)
илиor Other 5.x or later Linux (
хх64-bit).
Click Next.

| Предупреждение | ||
|---|---|---|
| ||
Important: Do not change the firmware after the guest OS is installed. The guest operating Operating system installer partitions the disk in a particular format, depending on the firmware version. If the firmware 'll be changed, it will not be able to boot the guest OS. |
On the 7 Customize hardware page, configure the VM hardware and options.
| Примечание | ||
|---|---|---|
| ||
You can leave the defaults and configure theVM hardware and options later. Some actions require that you power off the VM before settings'll be changedVM to be powered off for changes to take effect. |
Configuring VM Hardware:
CPU – Configuring Virtual CPU
configuratingallows to add, change, or configure CPU resources to improve VM performance.
Memory – Configuring Virtual Memory
configuratingallows
to addto add, change, or configure VM memory resources or options to enhance VM performance.
.New Hard disk* – Configuring Virtual Disk
configuratingallows
to addto add large-capacity virtual disks to VMs and add more space to existing disks, even when the VM is running.
New SCSI controller* – This setting allows to tweak SCSI, SATA, and NVMe Storage Controller conditions, limitations, and compatibility. To access virtual disks and SCSI devices, a VM uses storage controllers, which are added by default when you create the VM. You can add additional controllers or change the controller type after VM creation.
New Network* – Configuring VM Network
configurating. vSphere networking features provide communication between VMs on the same host,
between VMs onon different hosts, and between other virtual and physical machines. It is
ablepossible to select or change an adapter type, a network connection, and
whether to connect the network when the VM powers onnetwork connection if needed at VM startup.
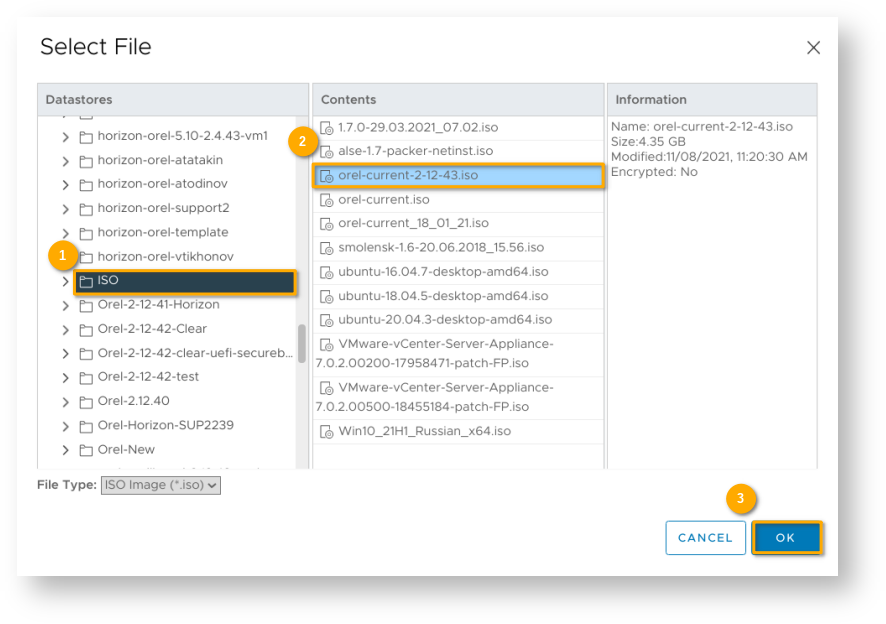
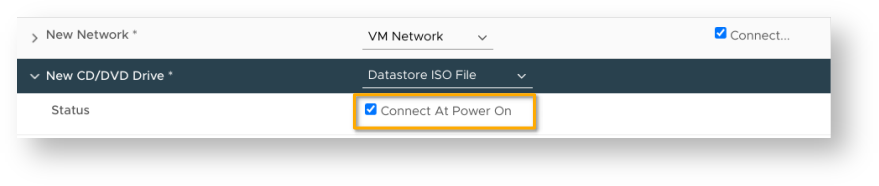
New CD/DVD Drive* – It is necessary to select the device from which the OS will be installed (please use a Select File form to specify Datastore ISO File
to be selected in storage using Select File form). Set the Connect At Power On status
so that CD-Rom turns on at the same time as VM, to initialize CD/DVD-Drive at VM startup.
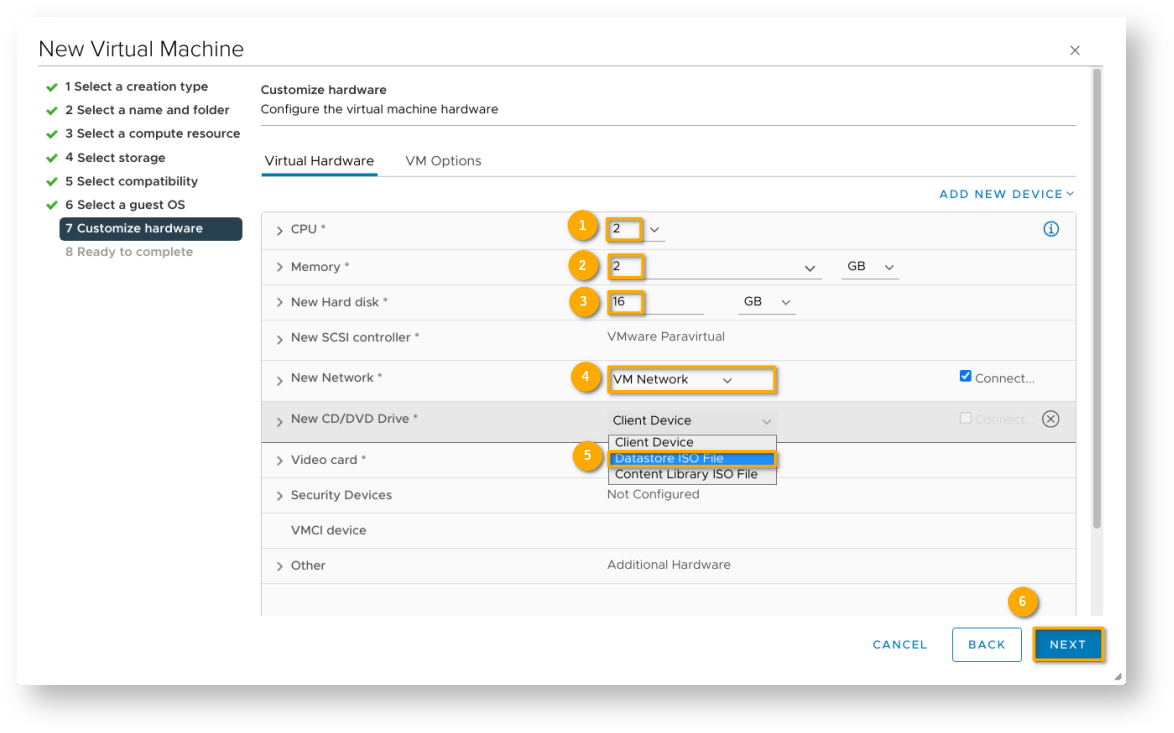
Security Devices – Securing VMs with Virtual Trusted Platform Module.
Other –
OtherConfiguring other VM Device
configurating. Not all devices are available to add and configure.
Configuring VM Options:
- in
in this section, it's
ablepossible to view following settings:
VM name
VM configuration file location
VM working location
Guest operating system and OS version
Currently, it's allowed only to edit the VM name.
VMware Remote Console Options –
the locking behavior of aVM lock settings and
the settings forsimultaneous connections settings.
- the
VM encryption settings
of a VM.
Power management – VM suspend behavior.
- Tolls
Tools – VMware Tools scripts.
Is necessary to customize theIt is possible to set up automatic VMware Tools
upgrades, automatically synchronize the guest time of the VM onupdate, automatic time synchronization between VM/guest and hypervisor at startup or resume
with the host, and
periodically synchronize the guest time with the hostperiodical time synchronization .
Boot Options – VM boot options. By default, the Firmware field is set
to EFIto EFI.
TheSecure Boot option needs to be disabled because
this protocol isit's not supported by FPP (Full Product Package)
Включить страницу pubkb:Astra Linux Common Edition pubkb:Astra Linux Common Edition
Включить страницу 2.12.ХХ
pubkb:2.
12.ХХ.

Advanced – advanced VM options:
Acceleration and logging settings
Debugging and statistics
Swap file location
Latency sensitivity
Fiber Channen NPIV – allows to change the virtual node and port World Wide Names (WWNs).
| Информация |
|---|
It's possible to view You can view or change VM settings from the within vSphere client. Not all settings are every setting is available for every either VM, and some settings are better to leave at their defaults. Read more – defaults are preferable for some of them. Read more here. |
After completing the hardware and VM settings, click Next.
On the 8 Ready to complete page, review the details and click click Finish. Создание и предварительная настройка виртуальной машины завершеныCreation and configuration complete.
VM launch
In the vSphere Client, select the VM and start it by clicking the Power On button![]() at the top of the window. Wherein the Power Status parameter will be displayed as Powered On.
at the top of the window. Wherein the Power Status parameter will be displayed as Powered On.

OS installation
Select the VM to install the OS, and launch the console with the Launch Console button ![]() . Select the VM to install the OS, and launch the console with the Launch Console button. In the OS launch window, specify the an installation mode and then follow the standard instructions (PDF to download – here). Setup and Maintenance Instructions for
. Select the VM to install the OS, and launch the console with the Launch Console button. In the OS launch window, specify the an installation mode and then follow the standard instructions (PDF to download – here). Setup and Maintenance Instructions for Включить страницу

After OS installing installed and configuring, it's need to install the configured, VMware Tools should be installed by entering folloing following stringin a Fly terminal (<Alt+T>)
| Блок кода |
|---|
apt install open-vm-tools open-vm-tools-desktop |
VMware Tools (пакет доступен только для Включить страницу
Please note that VMware Tools set is only available for Astra Linux Common Edition 2.12.43 and later.
Correct Correct installation and launch of OS and VMware Tools set installation and launch are indicated by the Running state and display of VMware Tools version displayed.
